Getting VMware vSphere Client to run on Windows 7 RTM
This post describes how you can get your VMware vSphere Client version 4 running on a 32-bit Windows 7 (RTM) installation until VMware makes an update to fix this Microsoft .Net problem. Be aware that this method of getting the client to run is not recommended in a production environment since you are running the client in development mode.
First you need to edit the VpxClient.exe.config file located in your C:\Program Files\Vmware\Infrastructure\Virtual Infrastructure Client\Launcher folder and make it look like the code below
<?xml version="1.0" encoding="utf-8"?>
<configuration>
<system.net>
<connectionManagement>
<clear/>
<add address="*" maxconnection="8" />
</connectionManagement>
</system.net>
<appSettings>
<add key = "protocolports" value = "https:443"/>
</appSettings>
<runtime>
<developmentMode developerInstallation="true"/>
</runtime>
</configuration>
Next we have to ensure that you we the .Net system.dll from a non Windows 7 machine.
It’s possible to download the config file and the DLL filer from here.
Place the modified config file in your C:\Program Files\Vmware\Infrastructure\Virtual Infrastructure Client\Launcher folder.
Then we create a new folder called Lib in the folder noted above and place the downloaded DLL file in the folder.

 Reboot your PC and VMware vSphere Client should now work without any error messages.
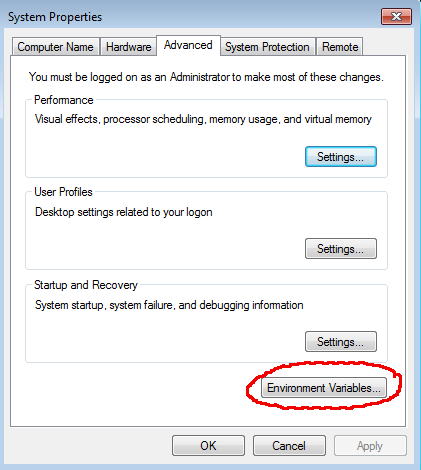
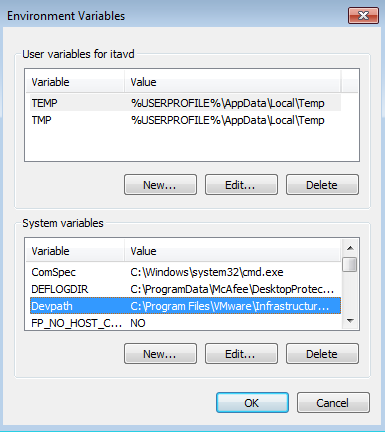
Edit your system properties and create a new ‘Environment Variable” Name it “Devpath” with the value of C:\Program Files\VMware\Infrastructure\Virtual Infrastructure Client\Launcher\Lib. You can locate these variables under Control Panel –> System and Security –> System –> Advanced system settings
This post came to life after reading this thread on the VMware Communties discussion forum. The thread also describes how to make VMware vSphere Client to work on 64-bit Windows 7 but I’m not going to describe that in this post.